
Here are some progress shots from the quilting progress. I started by quilting a straight line down the center of each diagonal purple chain in the triple Irish chain (sorry, I don't have any new whole quilt shots), just to hold everything together. That was hard work, because of my small machine and the long straight lines (done with a walking foot of course).
Then I started doodling to come up with a fantastic design for the white spaces, something a little less intense but along the lines of what Joan does (e.g here and here) and the awesome doodles by Jill (e.g. here and here). Well, I got pretty frustrated, because my own doodles didn't look awesome like Joan's and Jill's on the first try (go figure, haha!). I thought, there must be a better way, so I went to my little quilt stop around the corner and found a stencil, which likely was the right size - I found that out at home as I hadn't thought to measure my space *grins*. Sound familiar???
I started marking the circle with my water soluble purple Singer pen. I was scared to used it at first, and couldn't find the exact fabric I used for piecing to test it, so at first, I used a chalk pencil, but I don't like using those, they are slow for marking as the colour grey I have is so light, I have to draw a line several times before it's visible.

To add a little bit of an improv and personal touch, I added some plumes to each corner of the white space, free-hand:
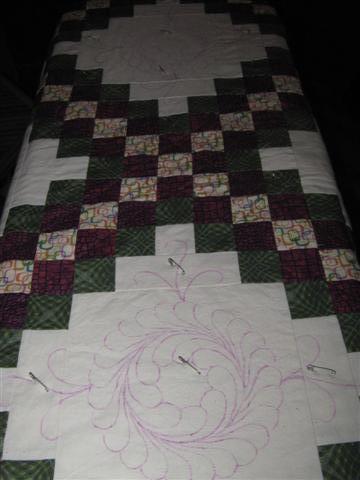
Then it was off to my little Singer and the free-motion foot. I have to admit, that I found the quilting of the feather circles very easy. The shapes just flowed, good size for free-motion quilting shapes! This video tutorial by Green Fairy Quilt really helped, I think it made the big difference between success and frustration, because the order in which I quilted the feathers before wasn't working for me).

I started getting pretty confident with my stitch length too, yay!
As before, when I sprayed the finished design with my water bottle, the purple pen just jumped right out, scary moments, and they were still scary 12 blocks later! :)

The result is well worth the scare though!

I varied the center fill in every block - almost ran out of ideas in the end. I only quilted this design in every second block as I wanted to have the quilt a bit less uniform.
For the second block, I did design my own stencil, just using cardboard. I quilted a 3/4" grid behind it, and now wish I hadn't, but because it was easier to quilt the grid in one motion with the design, and I did a few blocks before I decided it may have been a bad move, there's no way I'm going back to opening all the grids up again... But who knows, this might grow on me too, and the grid runs in the same direction as the Irish chain, so that might work. I did the quilting in about 4 intense days, "power-quilted" you might say! In fact, my marking pen is nearly empty, yikes!

 The back, especially the purple, shows the quilting really well:


I'll leave you with wintery pictures from earlier this week in PEI:
 Is snow removal done like this where you live too? Here on PEI, the snow is pushed to the center of the road, then a snowblower comes along (you can see the snow shoot out in the photo above) and a truck slowly drives along next to it, getting filled up (the one above is full, so the snow-chute is turned back to the center). Then the full trucks (about one ever 2 min) car the snow out of town (to a field??? Not the harbour anymore, I think, because of pollution concerns) and comes back empty.


.JPG)


3 comments:
Oh, wow! Your quilting is fantastic! You can no longer call this your disaster quilt.
OMGosh Christine the quilting is WONDERFUL!! You may not be able to doodle as well as Joan & Jill but with a bit of practice you could outshine them!!
On the rare ocassions that it snowed in Seattle, they would just plow it all in the middle and leave it, a bit rough for making left turns. In my little town they plow it all to the side of the road so you get to dig out big heavy compacted snow from your driveway entrance. Hate That!!
Crispy
Thank you for sharing your process! I'm about to break through my fear and get it in gear for free-motion quilting. I do love the way the quilt turned out!
Post a Comment