Monday, 22 March 2010

Just In Time For Spring

I don't know how, but I totally missed that it was National Quilt Day on Saturday - is it a US thing only?

Well, since it was the weekend, I was working on a quilt of course, so all is safe ;)

I figured: T'is the season for pulling out year-old projects!

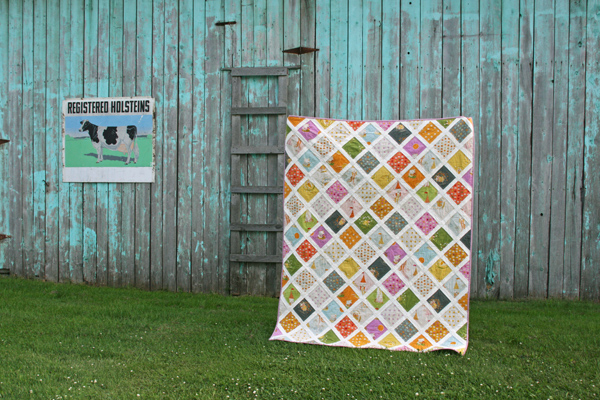
Like my spring quilt from 2009! Between this one and my "Apples and Owls" fall quilt, a kind of pattern is emerging: Make a seasonal top, then let it rest for a year and finish it the same season a year later!

In that spirit, I've finally jumped in the cold water and put a border on this quilt - that's really what the hold-up was: the border.

You may have noticed that I generally use fabrics from the quilt center in the borders. I've seen many quilts with totally different fabrics in the borders, but never had the guts to try that. Pick the wrong pattern/colour and the whole work of the quilt center is ruined.

But this time, I reached that point of thinking "just do SOMETHING"!

So I found some fabric that matches the light blue in one of the theme fabrics (the bluish leaves in the diagonal lines) and threw that on as border. You can see the pattern of the border print in the bottom of this photo: dark blue squares on light blue background.


I was worried it'd be too busy with the rest of the quilt, but I think it will do - too late now, anyway :) I'm not taking it off again!

I chose a green print for the backing - it made me think of spring even though it depicts wine and grapes, i.e. more fall-ish. I bought this fabric when it was on sale for 2$/m, what a steal (that's $ Can!).


See now, I always think it's outrageous how much fabric I bought in my first quilting year - meters and meters of fabric at once - but you make up a backing for a large quilt and woosh, 5 m are gone, just like that! (Imagine sound of snipping fingers).

I'm playing with some quilting ideas for this one, but I'm starting to believe that it'll actually be done in time for this year's spring (which has not arrived in Prince Edward Island! I'm so jealous of the budding flowers I see on blogs from down south!).

Sunday, 21 March 2010

Summer Purse Tutorial

I followed a basic fat quarter purse tutorial and built in some of my own modifications.

What you need:
  • about a fat quarter worth of outside fabric (e.g. print)
  • about a fat quarter worth of lining fabric (e.g. matching solid)
  • about 2 fat quarters worth of fusible interfacing
  • a pair of purse handles of your choice

I started by cutting a 2" x 20" strip of my print fabric (the width of the strip depends on the holes in your handles, as these are the handle attachments). Fold it in half lengthwise, right sides facing and sew along the long edge with 1/4" seam. I sewed this red ribbon to the starting end and had it inside the folded crease while sewing along the edge - this will help with the turning inside-out of the tube.
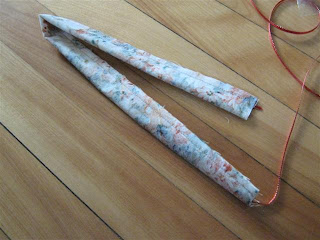
To turn the tube inside out, pull on the ribbon and tug and tease till the tube gets moving.


The start is finicky, after that: smooth cruising.

Press the tube with the seam in the middle (see the piece on the left below), then cut the tube strip in half, and both halves in half again. Mine came out to just under 5" each.

Pull each strip through a loop in your handle, match the ends up and secure them in place with a safety pin.


Switch to the purse body: instead of cutting a fat quarter in half, I cut a two pieces of print and lining fabric approximately the size of the purse I wanted to get. You should have 4 identical pieces: two of the print and two of the lining.

Cut matching pieces (4 in total) of fusible interfacing. Iron the interfacing to the wrong side of each fabric piece (my interfacing didn't stick very well - it was my first time working with the stuff, so I don't know if that's normal or not).


I didn't want a rectangular shape, so I marked 1.5" (the photo shows 1.75", but that looked to steep, so I changed it to 1.5") from the edge of the top side of my print and lining fabrics and cut a wedge off each side.

I cut all my layers at once, to make them identical.

Lay the lining pieces face up and center the purse handles on top as shown below. Decide how far you want to have your purse handles protrude from the purse, taking into account your seam allowance (I used 1/4" for everything). I left about 1.5" from the wooden handle to my seam allowance.

Place the print fabric on top of the lining and handle so that right sides are facing (interfacing on the outside).

Pin the handle straps in place and check that both halves of the purse have the handles positioned equally.


Sew along the top edge (i.e. the edge where your handles are attached) of each purse half only.


Sew over that edge again, about 1/8" closer to the fabric edge, and go over each handle strap back and forth twice to strengthen this seam.


Trim off the excess handle strap protruding past the seam.


It's starting to resemble a purse!


I decided that I wanted inside pockets. Cut identical pieces of lining and print fabric (1 each) per pocket in the size you want your pocket to be. I wanted my pockets to stand out, but if you want them more subtle, use lining fabric only. My pieces are about 6"x4".

Put the lining and print fabric pieces together right sides facing and sew 1/4" seam all around, leave a 1.5" opening. I rounded the bottom corners of my pocket, personal preference).


Turn the pouch inside out and use chopsticks or something similar to gently push the corner out.


Press the pockets so that the opening has the fabric folded in 1/4" - you don't have to hand-sew this shut, it'll be done by machine in the next step.


Place the pocket on the lining of your purse, you can pin it in place.


Sew along the edge, about 1/8" seam, all around the pocket, and enforce the start end end of the seam by sewing back and forth a few times.


Now the exciting part. Place the two purse halves right sides facing so that the linings match up with each other, and the prints on the other side of then handle (the handles should be in the middle of the sandwich. I think it's easiest for turning to have the handles both turned toward the lining, but that's a lot of bulk for sewing - you'll have to do what works best for you.)
Pin all around making sure that the corners and the middle seam (where lining switches to print) match up.


I wanted to add a little label, so I pinned it one one side between the lining layers. (It's just a 2"x2.5" of lining fabric with the sides turned in 1/4" and the whole thing folded in half lengthwise.)

Sew a 1/4" seam around the whole sandwich, but leave most of the lining bottom open so that you can fit your handles through when you turn the purse!


For a flat bottom, pinch all 4 corners of the purse sandwich and sew across the flap. The longer your seam, the wider your bottom. Your purse will stand up this way and have a bit more storage space for bulky items.


Snip the excess tips off.


Now the really awkward part of turning the whole think inside out through the opening.


After the turning inside out step, I managed to sew the opening shut for another 2" or 3" before I didn't have enough space to maneuver under the machine.


I pinned a 1/4" fold to make the hand-sewing easier.


Use the invisible ladder stitch or a similar type of hidden stitching to close the gap.


Almost invisible!


And here it is!


I'm really proud of my first-time purse accomplishment!


I love how the label worked out, you can see it on the left, very subtle.


I love the pockets so I don't have to rummage for keys or a handkerchief.


And I love that it's mine, with one of my favourite fabrics - this one always makes me think of summer and I've had it since I spotted it in a store at the age of 12 or so (way before my quilting days!).


I have a bunch of friends lined up to receive purses - my only problem are the handles - I'm having really bad luck finding nice ones like those sold at Joann's (black and sleek). I'll start searching the 2nd hand stores for old purses, and I might have a chance to visit Joann's in April, that'll be exciting!

So, do you feel like making one? This one took me an hour and a half from start to finish, so you have lots of time before summer!

Saturday, 20 March 2010

My Very Own Purse!

I'm not a purse-person. But I love this purse and can't wait for summer to carry it around with me on sunny days and mild evenings!


Tomorrow I'll show you how I made it!!

Friday, 19 March 2010

The Strings Are Coming Together

I've completed a few more string-blocks for the blue string-quilt.

I'm starting to get the full picture, now that I can lay out the blocks - that's a fun feeling!


Because of some deadlines (like trying to get the Mystery Quilt ready in time for last Wednesday's guild meeting), this project was put aside, but I'll keep plugging away on it in between other quilts. I've also realized that I need to collect many more blue strips for a big quilt. Luckily, there's no rush!

Wednesday, 17 March 2010

Maybe You Guys Can Help

I know a lot of you collect vintage things and most of my readers are spread all over the world, so maybe someone has some tip about the following strange strange discovery I made last Sunday.


My weekend breakfasts usually include boiled eggs, I grew up that way, so I have quite a variety of egg cups.

I own 3 egg cups that I remember from when I was very little and that were purchased in Europe as far as I know.


The last one is my absolute favourite, still, and I always use it for breakfast.

Now, you can just imagine my confusion when I was doing dishes at a friend's house in Nova Scotia, a province just south of PEI, still Canada, and found myself washing the eggcup shown below.

I suffered from momentary loss of my sense of location. I must be home if I'm washing my favourite egg cup, right???

Guess not. Guess you could by the exact same eggcup in Canada as in Europe about 30 or so years ago. Apart from the gold ring around the base on my own eggcup and slightly unsteady hand by whoever painted my parent duck (the wobbly bit on the beak), these are identical.

How strange is this??? I'm going to look into this a bit more! I'm already bombarding my friend's and my own parents with questions where they got the eggcups.

I just thought, maybe these are common as dirt, otherwise it would be such a coincidence that my friend owns the same eggcup. So I'm wondering, have you ever seen an eggcup with any of the motives in the photos above?

Back to a quilty post soon!!!

Tuesday, 16 March 2010

Progress On Red & Aqua And SITD Musings

Okay, so I decided on a suitable backing for the red and aqua quilt - happened to have something in darker shades of red and aqua, i.e. dark red and dark dark blue:

That was all basted together in a jiffy...


... and because I went for some very straight forward stitch-in-the-ditch quilting, that was done in no time, as well. Now the quilt is waiting for binding and it's complete.

I'm happy with the borders I chose - more subtle hues of the red and aqua, because the intensity of the quilt colours was getting to me.

That's also why I chose "in the ditch" quilting - whatever thread colour I would have chosen, it would have shown up big time on half the squares, and I didn't want to make this quilt any more busy than it was already.

Some Musings On Ditch-Stitching

I've come across some blogs by accomplished quilters in the past year, who seem to have a strong aversion to stitching in the ditch, poo-pooing that method at every chance they get. I've noticed that I started to shy away from SITD (maybe not an official abbreviation, but it is such a mouthful). Really, there's no reason to do that! I think SITD can have a great effect on a quilt, magically popping shapes out of the quilt without any apparent quilting on the front. Also, SITD is really quite tricky - the tiniest deviation from your line will show up big time when you either hit the bulky part of the seam or veer away from it - much different from a little off-line quilting during stippling for example, where everything is a bit off-line.

So, I've decided not to listen to the SITD bashers, use it when this quilting methods works well with the overall quilt and try my hardest to get better at my steady hand and keeping to the line!

Saturday, 13 March 2010

When Corners Don't Meet, Follow This Wisdom...

The other day, I had a great comment from Lane about my Mystery Quilt:
I like the pattern. And, from here, can't see any missed points. Like Eleanor Burns says, sometimes you have to "hang 'em high and keep 'em moving." Lane
I have to say I really like that saying! I guess I need an attic window for that purpose, right? :)

I put a couple of borders on the quilt and that framing effect made all the difference for me.

How do you like the little corner blocks? They were way more tricky than I anticipated - long story :)


I've got the backing almost done and am hoping to get this finished in time for the next guild meeting which might be next week!