Saturday, 2 February 2013

Warmer and Fuzzier

Here's an update on my Warm and Fuzzy Quilt project, which has been in the making for eternity (it feels like).

Originally, I wanted to alternate burgundy log cabin blocks with green log cabin blocks...

... but when I had the burgundy ones finished, I was (1) tired of making these blocks and (2) found the mix too colourful. I played around with different ideas and in the end decided to keep the whole thing burgundy.

Putting the blocks on point somehow made the whole design more dynamic:

I made a couple more blocks (I needed 12 instead of 10 now) and calculated the size blocks I needed for the solid diamonds and triangles.


Once it was sewn together, I really liked it! Now I'll think of a spiffy border and put the thing together!

I still need 2 small triangles for the last 2 corners. Right now the quilt measures around 60"x80".

It's good to be quilting again!

Sunday, 16 September 2012

Julia's Quilt Finito!

Okay, in the interest of ease and time, I stippled this quilt with rather big loops. My machine is quite slow on the different voltage in Europe. Maybe it's the adapter I use, but I haven't looked into a different model yet. I also bought a machine here that I use for piecing (I'd go mad piecing at the speed of my old Singer from Canada), but I haven't bought any attachments for free-motion quilting.


Amazingly, no problem quilting or putting on the binding, and ah! it was so pieceful and quiet to sew down the binding on the front...

Here's the finished product, delivered on schedule to my grandmother's:


Measures about 55 x 78 inches.

Friday, 7 September 2012

Putting the Pins in Julia's Quilt

You know, when you're used to basting on smooth floor, using tape instead of pinning a quilt to a carpet, it makes such a difference to live in a place with laminate flooring again (after a few months in a place with carpet).  Big sigh of relief!

I ruined my nails during pin-basting, as usual :) They were quite long, admittedly.  Apart from the tape getting old and coming off the floor over night, the basting went quite well.  What a refresher quilt this is!


I finally got to hear that great sound of hundreds of safty pins clicking on the floor when I shook out the quilt in the end :) Music in my ears.


And now it's ready for binding, one of my favourite steps!

Friday, 31 August 2012

Back of Julia's Quilt

Okay, next installment of the quilt for my cousin Julia.

This is a close up of the backing fabric:

I took some of the fabrics from the front and cut out the letters of her name and enlargements of the flowers on the white fabric, to be appliqued.


I don't really bother with heat'n'bond paper, glues or sprays to fix applique in place; I either find that the quilt gets too stiff with an extra layer, or don't have the stuff and can't be bothered to buy them for the rare times I need them.  I'm more of a piecer, on the whole. So pins do the trick for me...


I did the quick way of appliqueing, i.e. zigzagging around the shapes. Folding the edges under and hand-appliqueing is a lot prettier, but also takes a lot longer, and of course, there's a deadline for this quilt (upcoming birthday).


Okay, time for basting!

Friday, 24 August 2012

Special Order For My Cousin

See that white background fabric? My grandma bought a big chunk of it and said "Please use this an make a quilt for your cousin Julia, pattern doesn't matter, I leave it all up to you".  Okay :)

After a year of pretty much no quilting, I had to remember quite a bit, but it was pretty much like cycling :) 

I decided to use the white fabric for the back and picked a bunch of fabrics for the front that match in colour. 


I found it a bit too girlish, despite the green I added for a splash of something else, so I switched the purple against a burgundy. Much better, and better contrast, too. I know, I know, it's a quilt for a little girl, but in my experience, most girls grow out of pink/purple :)


I decided to do a pattern that I've used once before using brown and turquoise. The idea was that I wouldn't have to do any calculations, but of course I did, because I ended up making the blocks a bit smaller to fit the backing fabric. The page of notes in my design book got pretty messy, and I noticed how rusty I was considering seam allowances in my calculations...


After a few blunders, I got the hang of it again (especially the 'measure twice, cut once', haha).


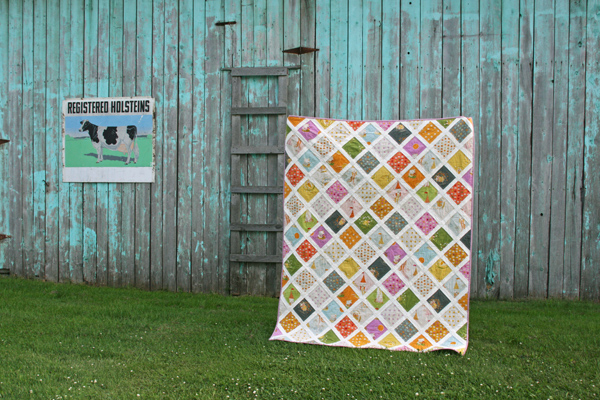
And here's my first layout of the front, hooray!


I've always liked photos of quilt tops against the light (have seen that on several other blogs) - it looks so much like a church window, so I decided to take one of these too!  I'm excited about this quilt and to be quilting properly again...


Now the question is: will I remember how to turn corners on the binding???? :)

Friday, 29 June 2012

New Home for my Mom's Mobile

That's what happens when people like the results of one's craftiness.  I almost didn't have to look up the instructions on how to layer the lining, padding and outside on this case.  If I do a few more, maybe I'll even lose the thrill while I'm turning the thing inside out (the thrill of wondering "will it work again?")


Friday, 22 June 2012

Ruffles galore

I was so tired of looking at my washing maschine, I decided to finally get in gear and make curtains. A curtain rod was already in place, though it was one I've never seen before and that needed special curtains: the ruffled kind :)

I went to the home hardware store and got the necessary parts (ruffling ribbon, hooks) and was going to barge ahead, but luckily I listened to the tiny voice that told me that it *might* just be a good idea to maybe see if someone may have posted a little video or tutorial on how to use this ruffle-ribbon :)

Well, I was so wrong in my original plans, I probably would have wasted a whole bunch of fabric and ribbon...

This is the final result:


And here's how I got there:


Materials:
  • Fabric about 30-50% wider than needed for the courtain width (to accomodate the ruffling), (selvadges removed, fabrice washed and ironed)
  • Enough ruffle ribbon for the width of the curtains
  • Enough hooks to have one about every 4"


This is the T-bar that the hooks will slide one later: it's kind of a T attached to an upside down T. I put masking tape along the raw edges to keep the curtain from slipping off the rod (I didn't want to have to go back to the store to get special end pieces - it's quite a ways to the next store that sells this stuff).


Start by finishing the edges along the sides by folding the fabric over twice and sewing it down (relatively large stitch length).

Next fold the top edge of the fabric 1"-1.5" and pin along the length of the fabric.

Pin the ribbon in place on top, so that the bottom edge of the ribbon aligns with the bottom edge of the folded fabric.

At the ends, flip about 2" of the ribbon under to make a nice finished edge. Importantly, pull out the 2 threads that run through the ribbon and that stick out in loops every once in a while out, so that they come out of the ribbon where it's folded over.

Here's what it looks like with the ribbon pinned in place and folded over at the edge. Between the two pins, you can see another spot where the 2 threads are loose so that they could easily be pulled out there.

Sew along the top and bottom edges of the ribbon, just catching the edges, so that you end up with a nice double seam on the finished side of the curtains. At the end, fold the ribbon under again, pulling out the 2 threads just as you did at the start of the seam.


Here I'm showing where the hooks will go through. These loose bits in the middle stip of the ribbon run in regular spots along the whole ribbon. Before I looked at instructions on how to do this, I had thought the hooks go through those loops made by the 2 threads :)

Put the hooks in like so:


Next, put all the hooks onto the T-bar and gently pull on the 2 threads that are hanging out at each end of the curtains. Pull and move the fabric along until you reach the desired width of your curtains. I then tied the 2 threads and hid them in the ribbon.

Here's what it looks like all aligned on the T-bar.


And now my guests have something pleasant to look at when using the guest bathroom :)