Showing posts with label Pink. Show all posts

Saturday, 18 October 2014

Pink Pillow

Remember this quilt?

I finished it in the fall of 2009 as a gift to my second-longest friend who particular asked for a pink quilt.
Recently, it was time for her annual celebration again. This year, I managed the multi-hour trip there to celebrate with her. It was a spontaneous decision, and the day before the party I thought: "I could make her a gift instead of getting a gift card or something else impersonal." My idea: a matching pillow case. I had a look through my fabric stash and recognized a few of the pink fabrics I had used for her quilt. I mixed those with a few new pinks and went for a simple patchwork pattern. Some rather rough calculations to get the approximate size and proportions of center and border and off I went.


Not sure: is this called a 'five-patch'? I cut 2.5" squares, added a 1" (cut) skinny border and a wide white border.


I quilted about 1/4" on either side of the seams. I rushed this job, and unfortunately some of my squares were pulled too far in one direction so that I ended up with slanted squares in some cases. Oh well.


I also added a 'fake' frame by quilting parallel lines around the white border.


I'm quite happy with the look of this!


During this rush-project, I truly appreciated having 2 sewing machines. It meant that I could quilt and sew binding strips on with the walking foot on one machine, while I could refill bobbins and sew together binding strips on the other one without having to cut thread or switch spools. Handy!


The top finished at around 16.5" square. For the backing, I used up the very last bit of fabric I had left of the original pink quilt backing. 2 pieces of about 13"x16.5". I folded one long edge on each piece twice to make 1/2" wide finished edge, ironed it and sewed it down with a double seam.


I then sandwiched everything together so that the backing pieces overlapped for about 5 or 6" and cropped the overhang of the backing. I attached top and backing of the pillow as I sewed on the binding. This was a bit tricky, but with enough pinning, everything worked out fine.


I started at 5pm, had a 2 hour break in the evening to go to the gym and had the pillowcase finished at 20 past midnight. Whoot whoot! The pillow case finished at about 16" square.


Here the finished product by daylight, bound, labelled and ready to go! The gift was a big hit that evening!


Friday, 25 July 2014

Now it has an owner

Friends of mine needed a baby shower gift and asked to buy one of my quilts. They chose the pink and grey one and asked to have it personalized.

The baby's name is Bjork, so I played around with the arrangements of letters.


We tried to come up with something for the second side, and in the end decided on the birth date. That didn't look good vertically, so I turned the letters to face inwards (it felt more of a unit than one of the sides facing outward).


I didn't like the colours of the birthdate at first (the purple was too dark and heavy), and settled for a more subtle mix of colours.


Then I zigzagged around each letter, dot and number. My god, it took forever. There were so many round shapes (which take longer because of the constant turning). I hope the next baby is called Lilly and born on 1.1.17!!! :)


I've been told that the quilt was a huge hit ;) What better news to warm a quilter's heart... Now I hope this quilt will be spit on, puked on, washed lots and loved for years!

Sunday, 16 September 2012

Julia's Quilt Finito!

Okay, in the interest of ease and time, I stippled this quilt with rather big loops. My machine is quite slow on the different voltage in Europe. Maybe it's the adapter I use, but I haven't looked into a different model yet. I also bought a machine here that I use for piecing (I'd go mad piecing at the speed of my old Singer from Canada), but I haven't bought any attachments for free-motion quilting.


Amazingly, no problem quilting or putting on the binding, and ah! it was so pieceful and quiet to sew down the binding on the front...

Here's the finished product, delivered on schedule to my grandmother's:


Measures about 55 x 78 inches.

Friday, 7 September 2012

Putting the Pins in Julia's Quilt

You know, when you're used to basting on smooth floor, using tape instead of pinning a quilt to a carpet, it makes such a difference to live in a place with laminate flooring again (after a few months in a place with carpet).  Big sigh of relief!

I ruined my nails during pin-basting, as usual :) They were quite long, admittedly.  Apart from the tape getting old and coming off the floor over night, the basting went quite well.  What a refresher quilt this is!


I finally got to hear that great sound of hundreds of safty pins clicking on the floor when I shook out the quilt in the end :) Music in my ears.


And now it's ready for binding, one of my favourite steps!

Friday, 31 August 2012

Back of Julia's Quilt

Okay, next installment of the quilt for my cousin Julia.

This is a close up of the backing fabric:

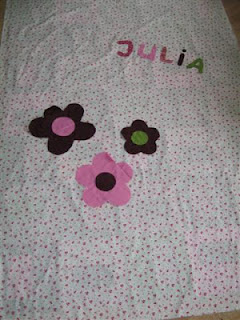
I took some of the fabrics from the front and cut out the letters of her name and enlargements of the flowers on the white fabric, to be appliqued.


I don't really bother with heat'n'bond paper, glues or sprays to fix applique in place; I either find that the quilt gets too stiff with an extra layer, or don't have the stuff and can't be bothered to buy them for the rare times I need them.  I'm more of a piecer, on the whole. So pins do the trick for me...


I did the quick way of appliqueing, i.e. zigzagging around the shapes. Folding the edges under and hand-appliqueing is a lot prettier, but also takes a lot longer, and of course, there's a deadline for this quilt (upcoming birthday).


Okay, time for basting!

Friday, 24 August 2012

Special Order For My Cousin

See that white background fabric? My grandma bought a big chunk of it and said "Please use this an make a quilt for your cousin Julia, pattern doesn't matter, I leave it all up to you".  Okay :)

After a year of pretty much no quilting, I had to remember quite a bit, but it was pretty much like cycling :) 

I decided to use the white fabric for the back and picked a bunch of fabrics for the front that match in colour. 


I found it a bit too girlish, despite the green I added for a splash of something else, so I switched the purple against a burgundy. Much better, and better contrast, too. I know, I know, it's a quilt for a little girl, but in my experience, most girls grow out of pink/purple :)


I decided to do a pattern that I've used once before using brown and turquoise. The idea was that I wouldn't have to do any calculations, but of course I did, because I ended up making the blocks a bit smaller to fit the backing fabric. The page of notes in my design book got pretty messy, and I noticed how rusty I was considering seam allowances in my calculations...


After a few blunders, I got the hang of it again (especially the 'measure twice, cut once', haha).


And here's my first layout of the front, hooray!


I've always liked photos of quilt tops against the light (have seen that on several other blogs) - it looks so much like a church window, so I decided to take one of these too!  I'm excited about this quilt and to be quilting properly again...


Now the question is: will I remember how to turn corners on the binding???? :)

Friday, 4 September 2009

Finally, A Label!

I bet you forgot about this quilt! The pink quilt :) It was basically finished, except for threads hanging loose along the seams and a missing label.

Well, I remedied the threads, mostly snipping them, unless I hadn't backstitched.

Then came the search for a label. The quilt is for a friend of mine in Germany, and luckily she's one of those persons you wish had more than one birthday because she's so vocal and clear about what she likes, it's always easy to find something for her.

Anyway, she really likes elephants and I just had some cute elephant fabric arrive in the mail.

So I cut a small patch of the fabric and used that as a label.


I have to say that I really like using printed fabric as label as opposed to plain muslin - might be a good way to use up some of my scraps, too!

Saturday, 20 June 2009

Visit At The Quilt Guild

Finally, after months of having conflicting appointments, I've managed to attend a quilt guild meeting in town. It happened to be the last before summer break, phew!

We had a pot luck and a show and share where some people showed us their quilts and home-made bags and explained a bit how they made them or why.

I showed my pink quilt, the baby wheely quilt and the baby pink zig zag and they were all well-received. Some people commented how wonderful it was to have a young quilter among them - I was the youngest by about 10-60 years :)

Here are some impressions:

This table was for a competition they had started in January, about who could finished the most UFOs. Participants sent in photos of the UFOs and in June, the finished objects were tallied. There was a prize for most finished objects (7), most UFOs to start with (23) and the UFO that took longest to finish (60 years, a 4H project started in 1949).

The outgoing guild president (in purple) received a box full of batik blocks in this pattern as thank you. Here they are laid out on the table.

Some other Show and Share items

There were three vendors selling fat quarters - I refrained successfully!


My quilting teachers from last year were at the guild meeting and helped me hold up the pink quilt properly, here it is, the first full view of it!


So, unless I have a conflict of time again in September, I will join the guild at the first meeting. It was a lot of fun to see everyone's work.

Thursday, 18 June 2009

Pink Quilt Done, Hooray!!!

Hooray hooray hooray!

I spent 2 hours Tuesday night binding the last side and a half. 7 meters binding in total, phew!
I wanted to get it done before my first quilt guild meeting Wednesday night, for show and tell.


It's big :) though barely big enough for a double bed (i.e. not a lot of overhang).

I love how the quilting looks on the back - some people who've seen the quilt thought it was a log cabin pattern at first glance.


My funky border - I love love love the buzzing-bee-line I quilted along the edge.


I'm very happy with this! Those of you who've followed the whole process of the pink quilt, what do you think about the final result??