I followed a basic fat quarter purse tutorial and built in some of my own modifications.
What you need:
- about a fat quarter worth of outside fabric (e.g. print)
- about a fat quarter worth of lining fabric (e.g. matching solid)
- about 2 fat quarters worth of fusible interfacing
- a pair of purse handles of your choice

I started by cutting a 2" x 20" strip of my print fabric (the width of the strip depends on the holes in your handles, as these are the handle attachments). Fold it in half lengthwise, right sides facing and sew along the long edge with 1/4" seam. I sewed this red ribbon to the starting end and had it inside the folded crease while sewing along the edge - this will help with the turning inside-out of the tube.
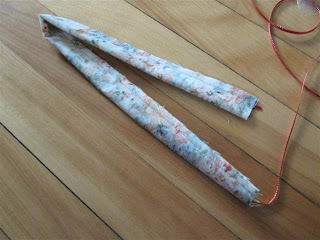
To turn the tube inside out, pull on the ribbon and tug and tease till the tube gets moving.

The start is finicky, after that: smooth cruising.

Press the tube with the seam in the middle (see the piece on the left below), then cut the tube strip in half, and both halves in half again. Mine came out to just under 5" each.

Pull each strip through a loop in your handle, match the ends up and secure them in place with a safety pin.

Switch to the purse body: instead of cutting a fat quarter in half, I cut a two pieces of print and lining fabric approximately the size of the purse I wanted to get. You should have 4 identical pieces: two of the print and two of the lining.
Cut matching pieces (4 in total) of fusible interfacing. Iron the interfacing to the wrong side of each fabric piece (my interfacing didn't stick very well - it was my first time working with the stuff, so I don't know if that's normal or not).

I didn't want a rectangular shape, so I marked 1.5" (the photo shows 1.75", but that looked to steep, so I changed it to 1.5") from the edge of the top side of my print and lining fabrics and cut a wedge off each side.


I cut all my layers at once, to make them identical.

Lay the lining pieces face up and center the purse handles on top as shown below. Decide how far you want to have your purse handles protrude from the purse, taking into account your seam allowance (I used 1/4" for everything). I left about 1.5" from the wooden handle to my seam allowance.

Place the print fabric on top of the lining and handle so that right sides are facing (interfacing on the outside).

Pin the handle straps in place and check that both halves of the purse have the handles positioned equally.

Sew along the top edge (i.e. the edge where your handles are attached) of each purse half only.

Sew over that edge again, about 1/8" closer to the fabric edge, and go over each handle strap back and forth twice to strengthen this seam.


Trim off the excess handle strap protruding past the seam.

It's starting to resemble a purse!

I decided that I wanted inside pockets. Cut identical pieces of lining and print fabric (1 each) per pocket in the size you want your pocket to be. I wanted my pockets to stand out, but if you want them more subtle, use lining fabric only. My pieces are about 6"x4".

Put the lining and print fabric pieces together right sides facing and sew 1/4" seam all around, leave a 1.5" opening. I rounded the bottom corners of my pocket, personal preference).

Turn the pouch inside out and use chopsticks or something similar to gently push the corner out.


Press the pockets so that the opening has the fabric folded in 1/4" - you don't have to hand-sew this shut, it'll be done by machine in the next step.

Place the pocket on the lining of your purse, you can pin it in place.

Sew along the edge, about 1/8" seam, all around the pocket, and enforce the start end end of the seam by sewing back and forth a few times.

Now the exciting part. Place the two purse halves right sides facing so that the linings match up with each other, and the prints on the other side of then handle (the handles should be in the middle of the sandwich. I think it's easiest for turning to have the handles both turned toward the lining, but that's a lot of bulk for sewing - you'll have to do what works best for you.)
Pin all around making sure that the corners and the middle seam (where lining switches to print) match up.

I wanted to add a little label, so I pinned it one one side between the lining layers. (It's just a 2"x2.5" of lining fabric with the sides turned in 1/4" and the whole thing folded in half lengthwise.)

Sew a 1/4" seam around the whole sandwich, but leave most of the lining bottom open so that you can fit your handles through when you turn the purse!

For a flat bottom, pinch all 4 corners of the purse sandwich and sew across the flap. The longer your seam, the wider your bottom. Your purse will stand up this way and have a bit more storage space for bulky items.

Snip the excess tips off.

Now the really awkward part of turning the whole think inside out through the opening.

After the turning inside out step, I managed to sew the opening shut for another 2" or 3" before I didn't have enough space to maneuver under the machine.

I pinned a 1/4" fold to make the hand-sewing easier.

Use the invisible ladder stitch or a similar type of hidden stitching to close the gap.

Almost invisible!

And here it is!

I'm really proud of my first-time purse accomplishment!

I love how the label worked out, you can see it on the left, very subtle.

I love the pockets so I don't have to rummage for keys or a handkerchief.

And I love that it's mine, with one of my favourite fabrics - this one always makes me think of summer and I've had it since I spotted it in a store at the age of 12 or so (way before my quilting days!).

I have a bunch of friends lined up to receive purses - my only problem are the handles - I'm having really bad luck finding nice ones like those sold at Joann's (black and sleek). I'll start searching the 2nd hand stores for old purses, and I might have a chance to visit Joann's in April, that'll be exciting!
So, do you feel like making one? This one took me an hour and a half from start to finish, so you have lots of time before summer!


.JPG)